


include <SoftwareSerial.h>
SoftwareSerial mySerial(11, 10); // TX-Pin11, RX-Pin10
void updateSerial()
{
delay(2000);
while (Serial.available()) {
mySerial.write(Serial.read());//Data received by Serial will be outputted by mySerial
}
while(mySerial.available()) {
Serial.write(mySerial.read());//Data received by mySerial will be outputted by Serial
}

}

void setup()
{
Serial.begin(115200);
mySerial.begin(115200);
}

void loop()
{
mySerial.println("AT"); // Once the handshake test is successful, it will back to OK

updateSerial();
mySerial.println("AT+CMGF=1"); // Configuring mode is TEST, only English texts are available
updateSerial();
mySerial.println("AT+CMGS=\"0098917*******\"");//xxxxxxxxxxx is the phone number
updateSerial();
mySerial.print("Hello, this is a test"); //text content
updateSerial();
mySerial.write(26);
while(1)
{
if(mySerial.available())
{
Serial.write(mySerial.read());//Data received by mySerial will be outputted by Serial
}
if(Serial.available())
{
mySerial.write(Serial.read());//Data received by Serial will be outputted by mySerial
}
}
}
لینک مفید
What’s more, our module is designed for working with Arduino/Crowduino more convenient at GSM/GPRS Quad-band 850/900/1800/1900 MHz with a special crowtail interface, supporting GPRS data traffic of download 85.6Kbps and upload 42.8Kbps at maximum rate. Additionally, it can arrive at 1KG peak suction and GPRS Class 10 with low standby current of 3ma less average standby current which reduce much energy consumption for you. A6 GPRS/GSM Module also supports digital audio and analog audio for HR, FR, EFR, AMR speech coding and gets ROHS, FCC, CE, CTA certification for its all-round functions.
Other A6 GPRS Electronic Modules with different interfaces: A6 GPRS/GSM Shield
Features
- Crowtail compatible
- Low standby current
- Standby average current 3ma less;
- Support the GSM / GPRS Quad-band, including 850,900,1800,1900MHZ;
- Support China Mobile and China Unicom’s 2G GSM network worldwide;
- GPRS Class 10;
- Support voice calls;
- Support SMS text messaging;
- Support GPRS data traffic, the maximum data rate, download 85.6Kbps, upload 42.8Kbps;
- Supports standard GSM07.07,07.05 AT commands and extended commands Ai-Thinker;
- Supports two serial ports, a serial port to download an AT command port;
- AT command supports the standard AT and TCP / IP command interface;
- Support digital audio and analog audio support for HR, FR, EFR, AMR speech coding;
- Support ROHS, FCC, CE, CTA certification;
Specifications
- Work voltage: 3.7V lipo battery
- Operating temperature -30 ℃ to + 80 ℃;
- Sensitivity <-105;
- GPRS multi-slot: 12, 1 to 12 may be configured
- GPRS mobile station: Class B
- Compatible with GSM Phase 2/2 +: Class 4 (2W @ 850/900 MHz) Class 1 (1W @ 1800 / 1900MHz)
- Current consumption: 1.3mA @ DRX = 5; 1.2mA @ DRX = 9
- AT command control: Standard GSM07.07,07.05 AT commands and extended commands Ai-Thinker
- SIM Application Toolkit
- GPRS Class 10: Up 85.6 kbps (upstream) & 42.8Kbps (downlink)
- USSD and PBCCH support
- Coding scheme: CS 1, 2, 3, 4
- Support CSD: Up 14.4 kbps
- Stack: PPP / TCP / UDP / HTTP / FTP / SMTP / MUX
Package list
- Crowtail- A6 GPRS/GSM Moddule x1
- Crowtail cable x 1
- GSM antenna x 1
Resources
Introduction
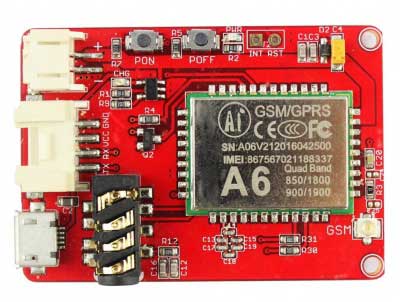
This is a A6 GPRS/GSM Shield, which is use the newest A6 GSM/GPRS module , A6 module is a GSM/GPRS function module.It supports GSM/GPRS Quad-Band(850、9001800/1900) network. Also, it supports voice calls,SMS messages,GPRS data service and so on .We can use it make a simple phone.
The module is controlled by AT command via UART and supports 3.3V and 4.2V logical level.
Model: CT009818G
Features
- Crowtail compatible
- Work voltage: 4.2V
- Operating temperature -30 ℃ to + 80 ℃;
- 1KG peak suction
- Low standby current
- Standby average current 3ma less;
- Support the GSM / GPRS Quad-band, including 850,900,1800,1900MHZ;
- Support China Mobile and China Unicom’s 2G GSM network worldwide;
- GPRS Class 10;
- Sensitivity <-105;
- Support voice calls;
- Support SMS text messaging;
- Support GPRS data traffic, the maximum data rate, download 85.6Kbps, upload 42.8Kbps;
- Supports standard GSM07.07,07.05 AT commands and extended commands Ai-Thinker;
- Supports two serial ports, a serial port to download an AT command port;
- AT command supports the standard AT and TCP / IP command interface;
- Support digital audio and analog audio support for HR, FR, EFR, AMR speech coding;
- Support ROHS, FCC, CE, CTA certification;
- SMT 42PIN
Specifications
- Quad-band: 850/900/1800/1900 MHz
- GPRS multi-slot: 12, 1 to 12 may be configured
- GPRS mobile station: Class B
- Compatible with GSM Phase 2/2 +: Class 4 (2W @ 850/900 MHz) Class 1 (1W @ 1800 / 1900MHz)
- Current consumption: 1.3mA @ DRX = 5; 1.2mA @ DRX = 9
- AT command control: Standard GSM07.07,07.05 AT commands and extended commands Ai-Thinker
- SIM Application Toolkit
- GPRS Class 10: Up 85.6 kbps (upstream) & 42.8Kbps (downlink)
- PBCCH support
- Coding scheme: CS 1, 2, 3, 4
- Support CSD: Up 14.4 kbps
- Support USSD
- Stack: PPP / TCP / UDP / HTTP / FTP / SMTP / MUX
Cautions
- Make sure your SIM card is unlocked.
- The product is provided as is without an insulating enclosure. Please observe ESD precautions specially in dry (low humidity) weather.
- It just supports baud rate 115200bps.
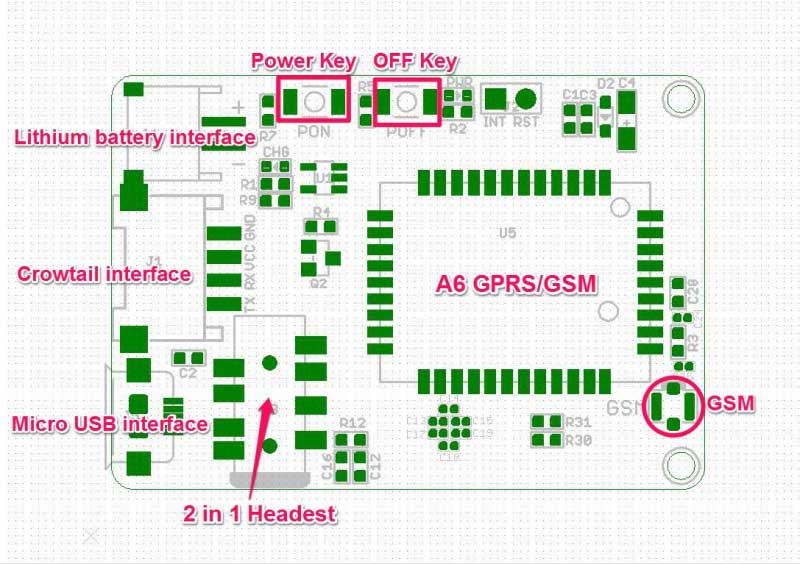
Interface Function
Usage
Hardware installation
Insert an Micro SIM card to SIM Card Holder
6 Pin Holder for SIM Cards. Both 1.8 volts and 3.0 volts SIM Cards are supported by A6 GPRS/GSM Module, the SIM card voltage type is automatically detected.

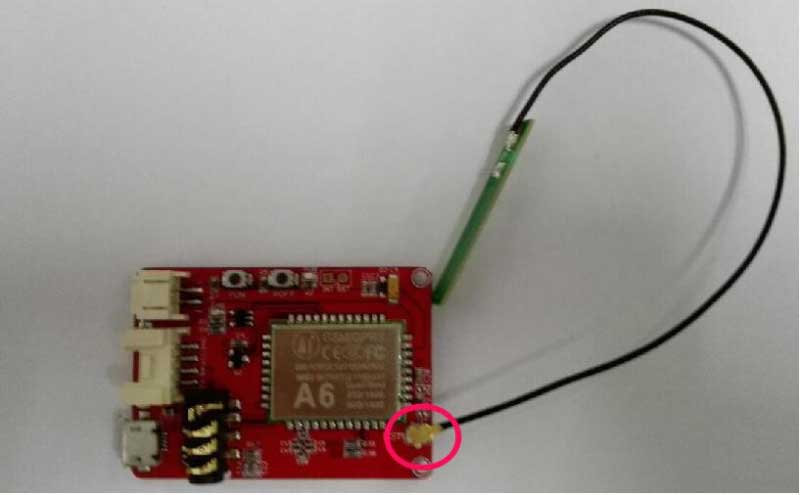
Connect the Antenna
A miniature coaxial RF connector is present on the Crowtail- A6 GPRS/GSM Module to connect with a GSM Antenna. The connector present on the Crowtail- A6 GPRS/GSM Module is called a U.FL connecto.The GSM Antenna supplied with the GPRS Shield has an SMA connector (and not an RP-SMA connector) on it.The connection topology is shown in the diagram below:
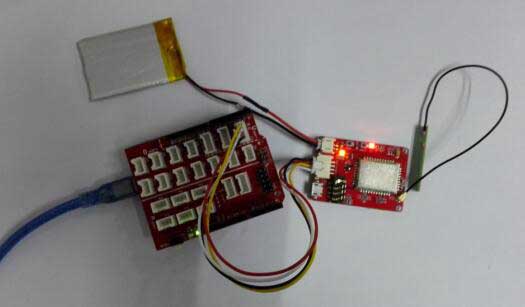
Plug to Arduino/Crowduino
Connect the Crowtail- A6 GPRS/GSM Module to U1 port on Crowtail- Base shield,and then plug the base shield onto Arduino
Download Code
- Type command in the terminal to execute different function, threr are 4 functions in the demo:
- If you input ‘t’, the demo will send a SMS message to another cellphone which you set(you need set the number in the code);
- If you input ‘d’, the program will dial a call to the other cellphone that you set(it is also need you set in the code );
- If you input ‘h’, it will submit a http request to a web that you want to access(it need you set the web adress in the code), it will return a string from the website if it goes correctly;
- If you input ‘s’, it will upload the datas to the pachube(for detail you can refer to the explanation in the code). I strongly recommend you input ‘h’ before input ‘s’, because uploading datas to the pachube need do some setting, after execute the function of submit a http request, the setting will be set.
- If the program returns error in the terminal after you typed the command, don’t worry, just try input the command again.
#include <String.h>
unsigned char SigQ[50];
unsigned char SigQ1[5]={'a','a','a','a','a'};
int SIGQ=0;

void setup()
{
  Serial1.begin(115200);               // the GPRS baud rate
  Serial.begin(115200);    // the GPRS baud rate
  delay(500);
//    mySerial.println("AT+CPIN?");  //get the signal Quality
//  delay(100);
//    pinMode(9, OUTPUT);
//  digitalWrite(9,LOW);
//  delay(1000);
//  digitalWrite(9,HIGH);
//  delay(1500);
//  digitalWrite(9,LOW);

//*******************************************************
//GetSignalQuality();
//*******************************************************
  for(int x=0;x<20;x++)
    {

   GetSignalQuality();
    delay(800);
    for(int i=0;i<26;i++)
    {
   if(SigQ[i]==58)
   {
     int j=0;
     int k=0;
     i++;i++;
     while((SigQ[i+j])!=44)
     {
      if((SigQ[i+j]>='0'&&SigQ[i+j]<='9'))  //>=48 <=57
      {
      SigQ1[j]=SigQ[i+j];
       }
       j++;  //j=1
     }
     SIGQ=SigQ1[0]-'0';

     if(j==2)
     {
     SIGQ=SIGQ*10+SigQ1[1]-'0';
     }
   Serial.println("");
   Serial.print("SIGQ:");
   Serial.println(SIGQ);
     }
   }
   if ( Serial1.available())
    Serial.write( Serial1.read());
   if (SIGQ>=10)
   {
     break;
   }
   if(x==20)
   {
    Serial.print("The Signal Quality is poor!");
   }
   }
  delay(2000);
DialVoiceCall();
if ( Serial1.available())
    Serial.write( Serial1.read());
}

void loop()
{
  //after start up the program, you can using terminal to connect the serial of gprs shield,
  //if you input 't' in the terminal, the program will execute SendTextMessage(), it will show how to send a sms message,
  //if input 'd' in the terminal, it will execute DialVoiceCall(), etc.
// GetSignalQuality();
 delay(500);
  if (Serial.available())
    switch(Serial.read())
   {
     case 't':
       SendTextMessage();
       break;
     case 'd':
       DialVoiceCall();
       break;
     case 'h':
       SubmitHttpRequest();
       break;
     case 's':
       Send2Pachube();
       break;
     case 'q':
       GetSignalQuality();
       break;
   }
  if ( Serial1.available())
    Serial.write( Serial1.read());
}

///SendTextMessage()
///this function is to send a sms message
void SendTextMessage()
{
   Serial1.print("AT+CMGF=1\r");    //Because we want to send the SMS in text mode
  delay(100);
   Serial1.println("AT + CMGS = \"+8613016490443\"");//send sms message, be careful need to add a country code before the cellphone number
  delay(100);
   Serial1.println("GSM test message!");//the content of the message
  delay(100);
   Serial1.println((char)26);//the ASCII code of the ctrl+z is 26
  delay(100);
   Serial1.println();
}

///DialVoiceCall
///this function is to dial a voice call
void DialVoiceCall()
{
   Serial1.println("AT+SNFS=0");
 delay(100);
   Serial1.println("ATDxxxxxxxxxx;");//dial the number
//mySerial.println("ATD + +8613826558615;");//dial the number
  delay(100);
   Serial1.println();
}

///SubmitHttpRequest()
///this function is submit a http request
///attention:the time of delay is very important, it must be set enough
void SubmitHttpRequest()
{
   Serial1.println("AT+CSQ");
  delay(100);

  ShowSerialData();// this code is to show the data from gprs shield, in order to easily see the process of how the gprs shield submit a http request, and the following is for this purpose too.

   Serial1.println("AT+CGATT?");
  delay(100);

  ShowSerialData();

   Serial1.println("AT+SAPBR=3,1,\"CONTYPE\",\"GPRS\"");//setting the SAPBR, the connection type is using gprs
  delay(1000);

  ShowSerialData();

   Serial1.println("AT+SAPBR=3,1,\"APN\",\"CMNET\"");//setting the APN, the second need you fill in your local apn server
  delay(4000);

  ShowSerialData();

   Serial1.println("AT+SAPBR=1,1");//setting the SAPBR, for detail you can refer to the AT command mamual
  delay(2000);

  ShowSerialData();

   Serial1.println("AT+HTTPINIT"); //init the HTTP request

  delay(2000);
  ShowSerialData();

   Serial1.println("AT+HTTPPARA=\"URL\",\"www.google.com.hk\"");// setting the httppara, the second parameter is the website you want to access
  delay(1000);

  ShowSerialData();

   Serial1.println("AT+HTTPACTION=0");//submit the request
  delay(10000);//the delay is very important, the delay time is base on the return from the website, if the return datas are very large, the time required longer.
  //while(!mySerial.available());

  ShowSerialData();

   Serial1.println("AT+HTTPREAD");// read the data from the website you access
  delay(300);

  ShowSerialData();

   Serial1.println("");
  delay(100);
}

///send2Pachube()///
///this function is to send the sensor data to the pachube, you can see the new value in the pachube after execute this function///
void Send2Pachube()
{
   Serial1.println("AT+CGATT?");
  delay(100);

  ShowSerialData();

   Serial1.println("AT+CSTT=\"CMNET\"");//start task and setting the APN,
  delay(1000);

  ShowSerialData();

   Serial1.println("AT+CIICR");//bring up wireless connection
  delay(300);

  ShowSerialData();

   Serial1.println("AT+CIFSR");//get local IP adress
  delay(2000);

  ShowSerialData();

   Serial1.println("AT+CIPSPRT=0");
  delay(3000);

  ShowSerialData();

   Serial1.println("AT+CIPSTART=\"tcp\",\"api.cosm.com\",\"8081\"");//start up the connection
  delay(2000);

  ShowSerialData();

   Serial1.println("AT+CIPSEND");//begin send data to remote server
  delay(4000);
  ShowSerialData();
  String humidity = "1031";//these 4 line code are imitate the real sensor data, because the demo did't add other sensor, so using 4 string variable to replace.
  String moisture = "1242";//you can replace these four variable to the real sensor data in your project
  String temperature = "30";//
  String barometer = "60.56";//
   Serial1.print("{\"method\": \"put\",\"resource\": \"/feeds/42742/\",\"params\"");//here is the feed you apply from pachube
  delay(500);
  ShowSerialData();
  Serial1.print(": {},\"headers\": {\"X-PachubeApiKey\":");//in here, you should replace your pachubeapikey
  delay(500);
  ShowSerialData();
   Serial1.print(" \"_cXwr5LE8qW4a296O-cDwOUvfddFer5pGmaRigPsiO0");//pachubeapikey
  delay(500);
  ShowSerialData();
   Serial1.print("jEB9OjK-W6vej56j9ItaSlIac-hgbQjxExuveD95yc8BttXc");//pachubeapikey
  delay(500);
  ShowSerialData();
  Serial1.print("Z7_seZqLVjeCOmNbEXUva45t6FL8AxOcuNSsQS\"},\"body\":");
  delay(500);
  ShowSerialData();
   Serial1.print(" {\"version\": \"1.0.0\",\"datastreams\": ");
  delay(500);
  ShowSerialData();
   Serial1.println("[{\"id\": \"01\",\"current_value\": \"" + barometer + "\"},");
  delay(500);
  ShowSerialData();
   Serial1.println("{\"id\": \"02\",\"current_value\": \"" + humidity + "\"},");
  delay(500);
  ShowSerialData();
   Serial1.println("{\"id\": \"03\",\"current_value\": \"" + moisture + "\"},");
  delay(500);
  ShowSerialData();
   Serial1.println("{\"id\": \"04\",\"current_value\": \"" + temperature + "\"}]},\"token\": \"lee\"}");


  delay(500);
  ShowSerialData();

   Serial1.println((char)26);//sending
  delay(5000);//waitting for reply, important! the time is base on the condition of internet
   Serial1.println();

  ShowSerialData();

   Serial1.println("AT+CIPCLOSE");//close the connection
  delay(100);
  ShowSerialData();
}
//*******************************************************
  //GetSignalQuality();
//*******************************************************

void GetSignalQuality()
{

   Serial1.println("AT+CSQ");  //get the signal Quality
  delay(100);
  int k=0;
  while( Serial1.available()!=0)
  {
    SigQ[k]= Serial1.read();
    Serial.write(SigQ[k]);
    k+=1;
  }
}

void ShowSerialData()
{
  while( Serial1.available()!=0)
    Serial.write( Serial1.read());
}

دیدگاهها
هیچ دیدگاهی برای این محصول نوشته نشده است.