


A6 GPRS/GSM Shield is designed for working with Arduino/Crowduino perfectly and more conveniently with a low-cost and efficient chip. The shield is an ideal tool to receive SMS text messages, set up GPRS/TCP functionality, or use it to remotely connect your Arduino to the Internet, create a DIY cell phone, and remotely post environment data to our data service running Phant. In addition, it is also widely used in the Internet of things, GPRS data transmission and GPS tracker recorder as many makers could see.
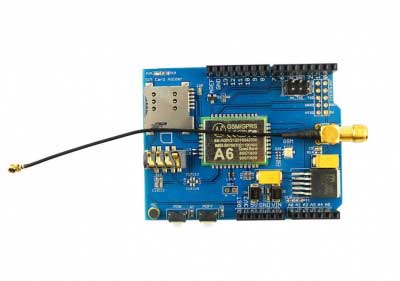
A6 GPRS/GSM Shield is of ultra-small size, low power consumption and wide operating temperature range at GSM/GPRS Quad-band 850/900/1800/1900 MHz with a special crowtail interface, supporting voice calls, SMS text messaging, GPRS data traffic of download 85.6Kbpsand upload 42.8Kbps at the maximum data rate. Moreover, it can arrive at 1KG peak suction and GPRS Class 10 with low standby current of 3ma less average standby current, supporting digital audio and analog audio for HR, FR, EFR, AMR speech coding and ROHS, FCC, CE, CTA certification. There are two U.FL connectors on the side of the chip – one labeled “GSM” the other “GPS.”both of which work great.

[code lang=”arduino” light=”true”]</div>
</div>
</div>
<div style="text-align: left;">
#include <SoftwareSerial.h>
SoftwareSerial mySerial(11, 10); // TX-Pin11, RX-Pin10
void updateSerial()
{
delay(2000);
while (Serial.available()) {
mySerial.write(Serial.read());//Data received by Serial will be outputted by mySerial
}
while(mySerial.available()) {
Serial.write(mySerial.read());//Data received by mySerial will be outputted by Serial
}
}
void setup()
{
Serial.begin(115200);
mySerial.begin(115200);
}
void loop()
{
mySerial.println("AT"); // Once the handshake test is successful, it will back to OK
updateSerial();
mySerial.println("AT+CMGF=1"); // Configuring mode is TEST, only English texts are available
updateSerial();
mySerial.println("AT+CMGS=\"0098917*******\"");//xxxxxxxxxxx is the phone number
updateSerial();
mySerial.print("Hello, this is a test"); //text content
updateSerial();
mySerial.write(26);
while(1)
{
if(mySerial.available())
{
Serial.write(mySerial.read());//Data received by mySerial will be outputted by Serial
}
if(Serial.available())
{
mySerial.write(Serial.read());//Data received by Serial will be outputted by mySerial
}
}
}
</div>
<div class="container active">
<div id="productDescription" class="content biggerText">
<div style="text-align: left;">[/code]
لینک مفید
Introduction
This is a A6 GPRS/GSM Shield, which is use the newest A6 GSM/GPRS module , A6 module is a GSM/GPRS function module.It supports GSM/GPRS Quad-Band(850、9001800/1900) network. Also, it supports voice calls,SMS messages,GPRS data service and so on .We can use it make a simple phone.
The module is controlled by AT command via UART and supports 3.3V and 4.2V logical level.
Model: ACS20950A
Features
- Operating temperature -30 ℃ to + 80 ℃;
- 1KG peak suction
- Low standby current
- Operating Voltage 3.3V-4.2V;
- Power voltage> 3.4V;
- Standby average current 3ma less;
- Support the GSM / GPRS four bands, including 850,900,1800,1900MHZ;
- Support China Mobile and China Unicom’s 2G GSM network worldwide;
- GPRS Class 10;
- Sensitivity <-105;
- Support voice calls;
- Support SMS text messaging;
- Support GPRS data traffic, the maximum data rate, download 85.6Kbps, upload 42.8Kbps;
- Supports standard GSM07.07,07.05 AT commands and extended commands Ai-Thinker;
- Supports two serial ports, a serial port to download an AT command port;
- AT command supports the standard AT and TCP / IP command interface;
- Support digital audio and analog audio support for HR, FR, EFR, AMR speech coding;
- Support ROHS, FCC, CE, CTA certification;
- SMT 42PIN
Specifications
- Quad-band: 850/900/1800/1900 MHz
- GPRS multi-slot: 12, 1 to 12 may be configured
- GPRS mobile station: Class B
- Compatible with GSM Phase 2/2 +: Class 4 (2W @ 850/900 MHz) Class 1 (1W @ 1800 / 1900MHz)
- Supply voltage: 3.3 ~ 4.2V 4.0V typ.
- Current consumption: 1.3mA @ DRX = 5; 1.2mA @ DRX = 9
- AT command control: Standard GSM07.07,07.05 AT commands and extended commands Ai-Thinker
- SIM Application Toolkit
- GPRS Class 10: Up 85.6 kbps (upstream) & 42.8Kbps (downlink)
- PBCCH support
- Coding scheme: CS 1, 2, 3, 4
Support CSD: Up 14.4 kbps Support USSD
- Stack: PPP / TCP / UDP / HTTP / FTP / SMTP / MUX
Cautions
- Make sure your SIM card is unlocked.
- The product is provided as is without an insulating enclosure. Please observe ESD precautions specially in dry (low humidity) weather.
- It just supports baud rate 115200bps.
Interface Function
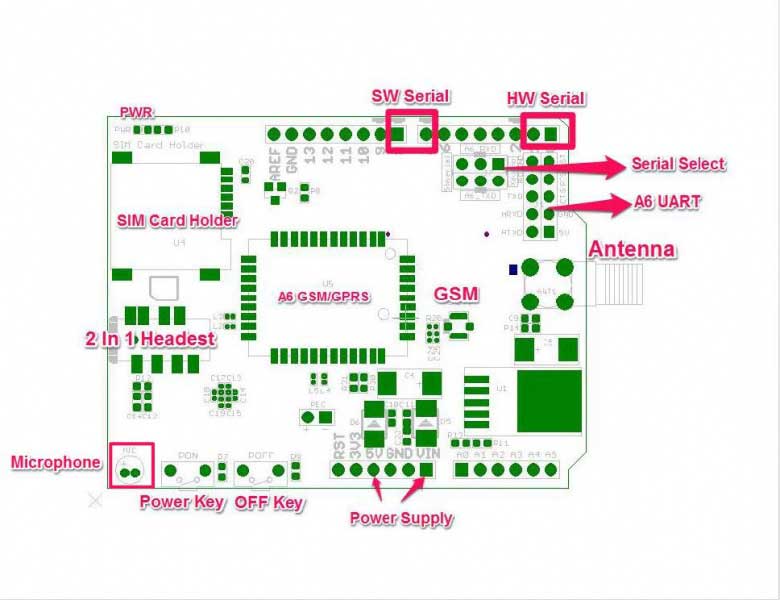
Power supply – Vin connected to external 5~9VDC power supply
Antenna interface – connected to external antenna
Serial port select – select either software serial port or hareware serial port to be connected to GSM/GPRS Shield
Hardware Serial – D0/D1 of Arduino/Crowduino
Software serial – D7/D8 of Arduino/Crowduino
UART of A6 – UART pins breakout of A6
Microphone – to answer the phone call
Speaker – to answer the phone call
GPIO,PWM and ADC of A^ – GPIO,PWM and ADC pins breakout of SIM808
Power key – power up for A6 OFF key – power down for A6
Pins usage on Arduino
D0 – Unused if you select hardware serial port to communicate with GPRS+GSM+GPS Shield
D1 – Unused if you select hardware serial port to communicate with GPRS+GSM+GPS Shield
D2 – Unused
D3 – Unused
D4 – Unused
D5 – Unused
D6 – Unused
D7 – Used if you select software serial port to communicate with GPRS+GSM+GPS Shield
D8 – Used if you select software serial port to communicate with GPRS+GSM+GPS Shield
D9 – Used for software control the power up or down of the SIM808
D10 – Unused
D11 – Unused
D12 – Unused
D13 – Unused
D14(A0) – Unused
D15(A1) – Unused
D16(A2) – Unused
D17(A3) – Unused
D18(A4) – Unused
D19(A5) – Unused
Usage
Hardware installation
1.Insert an Micro SIM card to SIM Card Holder
6 Pin Holder for SIM Cards. Both 1.8 volts and 3.0 volts SIM Cards are supported by A6 GPRS/GSM Shield, the SIM card voltage type is automatically detected.
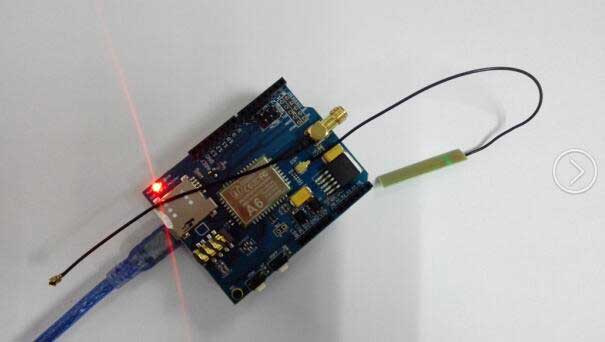
2.Connect the Antenna
A miniature coaxial RF connector is present on the A6 GPRS/GSM Shield board to connect with a GSM Antenna. The connector present on the A6 GPRS/GSM Shield is called a U.FL connecto.The GSM Antenna supplied with the GPRS Shield has an SMA connector (and not an RP-SMA connector) on it.The connection topology is shown in the diagram below:
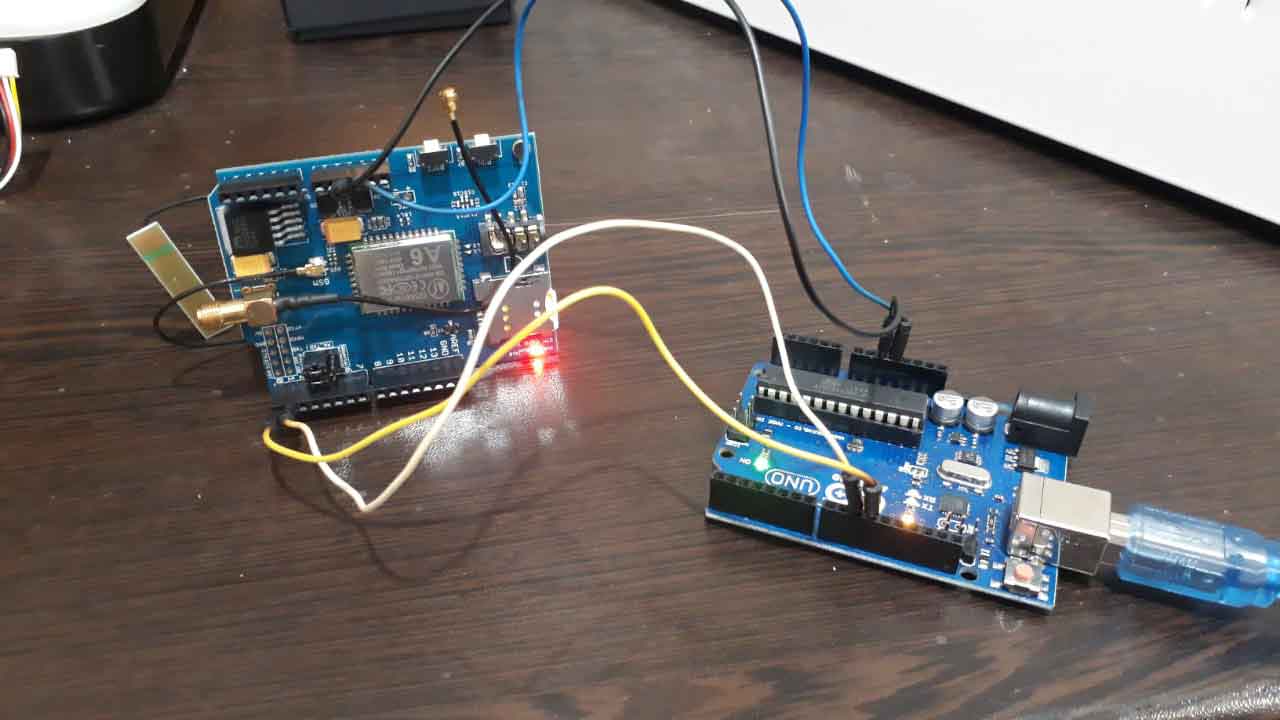
3.Plug to Arduino/Crowduino
The A6 GPRS/GSM Shield, like any other well designed shield, is stackable as shown in the photo below.And connect Arduino to PC by using a USB cable.
With serial debugging tools
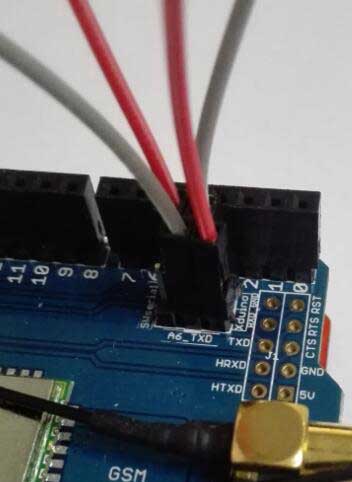
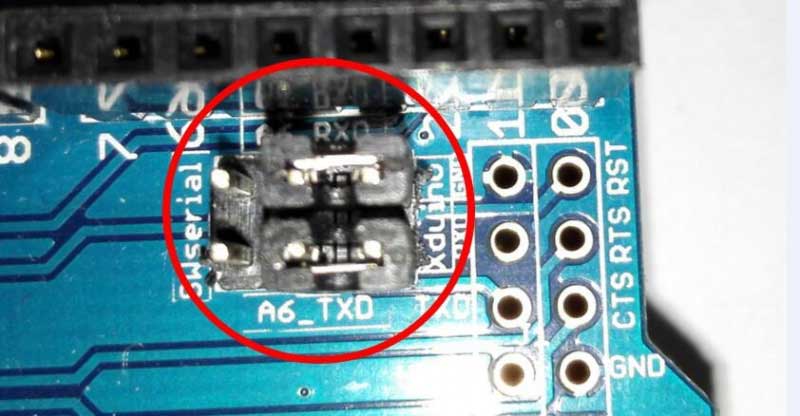
1.Before use the serial debugging tool, we need select the hareware serial port.
Male – Female Splittable Jumper Wire Connect the A6_RXD to MTXD and A6_TXD to MRXD with female-feamale splittable jumper wire.
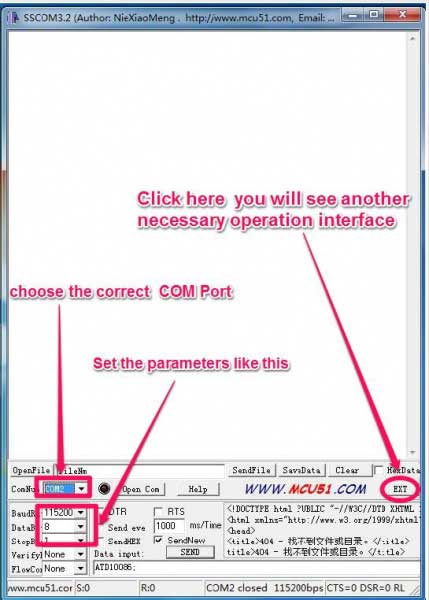
2.Download the serial debugging tool,unzip it and open the sscom32E.exe file
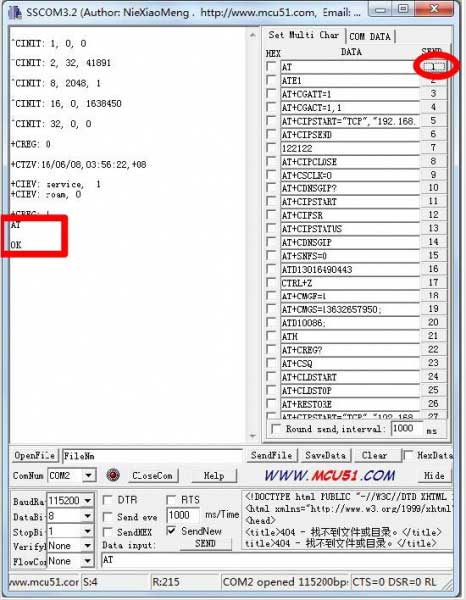
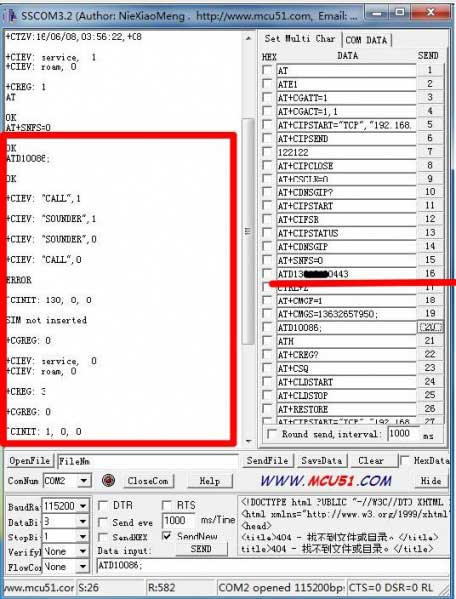
3.Let’s start the mudule,Long press the power key for more than 2 seconds,if you will see some information in the serial debug window as bellow,it mens This module is started successfully.
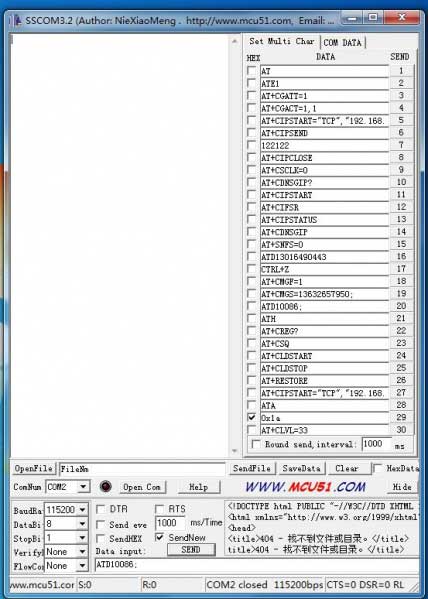
4.Now we can make a telephone calls,
Click on the the number “1” to send the AT command, and you will see “OK” in the receive window,it means the serial port communication no problem.
Insert the headset into the headset port click on the number”15″ to send the AT+SNFS=0 command,if display “0k” means success into headphones mode.
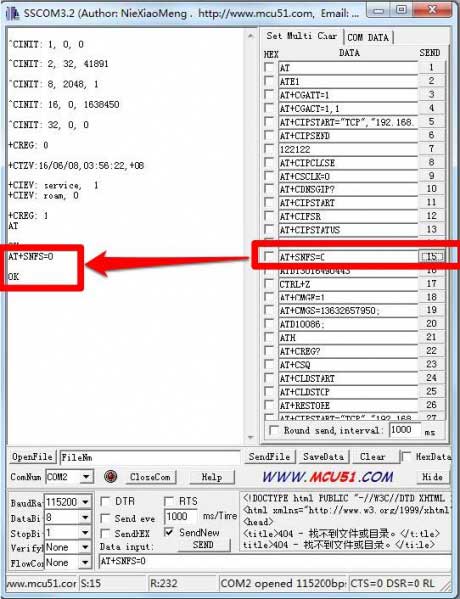
Click on the number”15″ to send the ATDXXXXXXXXX command,”XXXXXXXX”is the phone number you want to call,if display “OK”,then start dialing.you can enjoy the call.
Of course not just these functions, you can send some other command to achieve different functions
| AT Command | Description |
|---|---|
| AT + CGATT = 1 | Return OK, attached to the network |
| AT + CGACT = 1 | Activate the network, then you can use the tcp/ip command |
| AT + CIPSTART = “TCP” “121.41.97.28”, 60000 | TCPIP server connection |
| AT + CIPCLOSE | Close TCP/IP connection |
| AT+CMGF=1 | Send a text message |
| AT+CIPTCFG | Passthrough mode configuration |
| AT+CIPTMODE | Enter the passthrough mode |
With Arduino Leonardo
The demo code below is for the Xduino to send SMS message/dial a voice call/submit a http request to a website and upload datas to the pachube. It has been tested on Arduino Duemilanove but will work on any compatible variant, plesse note that this sketch uses the sorfware UART of ATmega328P. please follow the following steps for running this sketch.
- With the A6 GPRS/GSM Shield removed, download this sketch into your Arduino.
- Disconnect the Xduino from USB port to remove power source.
- Set the Serial Port jumpers on the A6 GPRS/GSM Shield in SWserial position, to use the Soft Serial port of Arduino.
- Connect the antenna to the A6 GPRS/GSM Shield and insert the SIM Card.
- Mount the GPRS Shield on Arduino.
- Connect the Arduino to the computer by USB, and fire up your favorite serial terminal software on computer, choose the COM port for Arduino, set it to operate at 115200.
- Type command in the terminal to execute different function, threr are 4 functions in the demo:
- If you input ‘t’, the demo will send a SMS message to another cellphone which you set(you need set the number in the code);
- If you input ‘d’, the program will dial a call to the other cellphone that you set(it is also need you set in the code );
- If you input ‘h’, it will submit a http request to a web that you want to access(it need you set the web adress in the code), it will return a string from the website if it goes correctly;
- If you input ‘s’, it will upload the datas to the pachube(for detail you can refer to the explanation in the code). I strongly recommend you input ‘h’ before input ‘s’, because uploading datas to the pachube need do some setting, after execute the function of submit a http request, the setting will be set.
- If the program returns error in the terminal after you typed the command, don’t worry, just try input the command again.
#include <String.h>
unsigned char SigQ[50];
unsigned char SigQ1[5]={'a','a','a','a','a'};
int SIGQ=0;

void setup()
{
  Serial1.begin(115200);               // the GPRS baud rate
  Serial.begin(115200);    // the GPRS baud rate
  delay(500);
//    mySerial.println("AT+CPIN?");  //get the signal Quality
//  delay(100);
//    pinMode(9, OUTPUT);
//  digitalWrite(9,LOW);
//  delay(1000);
//  digitalWrite(9,HIGH);
//  delay(1500);
//  digitalWrite(9,LOW);

//*******************************************************
//GetSignalQuality();
//*******************************************************
  for(int x=0;x<20;x++)
    {

   GetSignalQuality();
    delay(800);
    for(int i=0;i<26;i++)
    {
   if(SigQ[i]==58)
   {
     int j=0;
     int k=0;
     i++;i++;
     while((SigQ[i+j])!=44)
     {
      if((SigQ[i+j]>='0'&&SigQ[i+j]<='9'))  //>=48 <=57
      {
      SigQ1[j]=SigQ[i+j];
       }
       j++;  //j=1
     }
     SIGQ=SigQ1[0]-'0';

     if(j==2)
     {
     SIGQ=SIGQ*10+SigQ1[1]-'0';
     }
   Serial.println("");
   Serial.print("SIGQ:");
   Serial.println(SIGQ);
     }
   }
   if ( Serial1.available())
    Serial.write( Serial1.read());
   if (SIGQ>=10)
   {
     break;
   }
   if(x==20)
   {
    Serial.print("The Signal Quality is poor!");
   }
   }
  delay(2000);
DialVoiceCall();
if ( Serial1.available())
    Serial.write( Serial1.read());
}

void loop()
{
  //after start up the program, you can using terminal to connect the serial of gprs shield,
  //if you input 't' in the terminal, the program will execute SendTextMessage(), it will show how to send a sms message,
  //if input 'd' in the terminal, it will execute DialVoiceCall(), etc.
// GetSignalQuality();
 delay(500);
  if (Serial.available())
    switch(Serial.read())
   {
     case 't':
       SendTextMessage();
       break;
     case 'd':
       DialVoiceCall();
       break;
     case 'h':
       SubmitHttpRequest();
       break;
     case 's':
       Send2Pachube();
       break;
     case 'q':
       GetSignalQuality();
       break;
   }
  if ( Serial1.available())
    Serial.write( Serial1.read());
}

///SendTextMessage()
///this function is to send a sms message
void SendTextMessage()
{
   Serial1.print("AT+CMGF=1\r");    //Because we want to send the SMS in text mode
  delay(100);
   Serial1.println("AT + CMGS = \"+8613016490443\"");//send sms message, be careful need to add a country code before the cellphone number
  delay(100);
   Serial1.println("GSM test message!");//the content of the message
  delay(100);
   Serial1.println((char)26);//the ASCII code of the ctrl+z is 26
  delay(100);
   Serial1.println();
}

///DialVoiceCall
///this function is to dial a voice call
void DialVoiceCall()
{
   Serial1.println("AT+SNFS=0");
 delay(100);
   Serial1.println("ATDxxxxxxxxxx;");//dial the number
//mySerial.println("ATD + +8613826558615;");//dial the number
  delay(100);
   Serial1.println();
}

///SubmitHttpRequest()
///this function is submit a http request
///attention:the time of delay is very important, it must be set enough
void SubmitHttpRequest()
{
   Serial1.println("AT+CSQ");
  delay(100);

  ShowSerialData();// this code is to show the data from gprs shield, in order to easily see the process of how the gprs shield submit a http request, and the following is for this purpose too.

   Serial1.println("AT+CGATT?");
  delay(100);

  ShowSerialData();

   Serial1.println("AT+SAPBR=3,1,\"CONTYPE\",\"GPRS\"");//setting the SAPBR, the connection type is using gprs
  delay(1000);

  ShowSerialData();

   Serial1.println("AT+SAPBR=3,1,\"APN\",\"CMNET\"");//setting the APN, the second need you fill in your local apn server
  delay(4000);

  ShowSerialData();

   Serial1.println("AT+SAPBR=1,1");//setting the SAPBR, for detail you can refer to the AT command mamual
  delay(2000);

  ShowSerialData();

   Serial1.println("AT+HTTPINIT"); //init the HTTP request

  delay(2000);
  ShowSerialData();

   Serial1.println("AT+HTTPPARA=\"URL\",\"www.google.com.hk\"");// setting the httppara, the second parameter is the website you want to access
  delay(1000);

  ShowSerialData();

   Serial1.println("AT+HTTPACTION=0");//submit the request
  delay(10000);//the delay is very important, the delay time is base on the return from the website, if the return datas are very large, the time required longer.
  //while(!mySerial.available());

  ShowSerialData();

   Serial1.println("AT+HTTPREAD");// read the data from the website you access
  delay(300);

  ShowSerialData();

   Serial1.println("");
  delay(100);
}

///send2Pachube()///
///this function is to send the sensor data to the pachube, you can see the new value in the pachube after execute this function///
void Send2Pachube()
{
   Serial1.println("AT+CGATT?");
  delay(100);

  ShowSerialData();

   Serial1.println("AT+CSTT=\"CMNET\"");//start task and setting the APN,
  delay(1000);

  ShowSerialData();

   Serial1.println("AT+CIICR");//bring up wireless connection
  delay(300);

  ShowSerialData();

   Serial1.println("AT+CIFSR");//get local IP adress
  delay(2000);

  ShowSerialData();

   Serial1.println("AT+CIPSPRT=0");
  delay(3000);

  ShowSerialData();

   Serial1.println("AT+CIPSTART=\"tcp\",\"api.cosm.com\",\"8081\"");//start up the connection
  delay(2000);

  ShowSerialData();

   Serial1.println("AT+CIPSEND");//begin send data to remote server
  delay(4000);
  ShowSerialData();
  String humidity = "1031";//these 4 line code are imitate the real sensor data, because the demo did't add other sensor, so using 4 string variable to replace.
  String moisture = "1242";//you can replace these four variable to the real sensor data in your project
  String temperature = "30";//
  String barometer = "60.56";//
   Serial1.print("{\"method\": \"put\",\"resource\": \"/feeds/42742/\",\"params\"");//here is the feed you apply from pachube
  delay(500);
  ShowSerialData();
  Serial1.print(": {},\"headers\": {\"X-PachubeApiKey\":");//in here, you should replace your pachubeapikey
  delay(500);
  ShowSerialData();
   Serial1.print(" \"_cXwr5LE8qW4a296O-cDwOUvfddFer5pGmaRigPsiO0");//pachubeapikey
  delay(500);
  ShowSerialData();
   Serial1.print("jEB9OjK-W6vej56j9ItaSlIac-hgbQjxExuveD95yc8BttXc");//pachubeapikey
  delay(500);
  ShowSerialData();
  Serial1.print("Z7_seZqLVjeCOmNbEXUva45t6FL8AxOcuNSsQS\"},\"body\":");
  delay(500);
  ShowSerialData();
   Serial1.print(" {\"version\": \"1.0.0\",\"datastreams\": ");
  delay(500);
  ShowSerialData();
   Serial1.println("[{\"id\": \"01\",\"current_value\": \"" + barometer + "\"},");
  delay(500);
  ShowSerialData();
   Serial1.println("{\"id\": \"02\",\"current_value\": \"" + humidity + "\"},");
  delay(500);
  ShowSerialData();
   Serial1.println("{\"id\": \"03\",\"current_value\": \"" + moisture + "\"},");
  delay(500);
  ShowSerialData();
   Serial1.println("{\"id\": \"04\",\"current_value\": \"" + temperature + "\"}]},\"token\": \"lee\"}");


  delay(500);
  ShowSerialData();

   Serial1.println((char)26);//sending
  delay(5000);//waitting for reply, important! the time is base on the condition of internet
   Serial1.println();

  ShowSerialData();

   Serial1.println("AT+CIPCLOSE");//close the connection
  delay(100);
  ShowSerialData();
}
//*******************************************************
  //GetSignalQuality();
//*******************************************************

void GetSignalQuality()
{

   Serial1.println("AT+CSQ");  //get the signal Quality
  delay(100);
  int k=0;
  while( Serial1.available()!=0)
  {
    SigQ[k]= Serial1.read();
    Serial.write(SigQ[k]);
    k+=1;
  }
}

void ShowSerialData()
{
  while( Serial1.available()!=0)
    Serial.write( Serial1.read());
}

دیدگاهها
هیچ دیدگاهی برای این محصول نوشته نشده است.